Pith. sign in

REVIEW

Rare bottom-baryon dileptonic decays are analyzed in the Type III 2HDM using light-cone QCD form factors, with predictions for branching ratios and asymmetries testable at LHCb and Belle II.

Reviewed by Pith at T0; open to challenge. T0 means a machine referee read the full paper against a public rubric. the ladder, T0–T4 →

arxiv 2604.15834 v4 pith:LD2ND7YS submitted 2026-04-17 hep-ph hep-exhep-lat

Comprehensive analyses of rare Λ_b rightarrow Λ ell^+ ell^-, Sigma_b rightarrow Sigma ell^+ ell^- and Xi_b rightarrow Xi ell^+ ell^- decays in the 2HDM

classification hep-ph hep-exhep-lat
keywords rightarrowdecayslambdamodelsigmadecayrarebranching
verification ladder T0 review T1 audit T2 compute T3 formal T4 reserved

The pith

A machine-rendered reading of the paper's core claim, the machinery that carries it, and where it could break.

Heavy baryons containing a bottom quark can decay into lighter baryons plus a pair of leptons (muons or tau leptons). These rare decays are sensitive to new heavy particles, such as additional Higgs bosons predicted by the Two-Higgs-Doublet Model (2HDM) Type III, which allows more general couplings than simpler variants. The authors compute observable quantities — decay rates, branching ratios, and forward-backward asymmetries — for three baryon families using form factors derived from light-cone QCD sum rules. They compare the Standard Model predictions against the 2HDM Type III to see where the two models diverge. The key idea is that if the measured decay rates or asymmetries deviate from Standard Model expectations, the discrepancy could point to new Higgs particles. The paper highlights that upcoming data from LHCb and Belle II could test these predictions. The analysis covers both muon and tau lepton final states, with tau modes being especially sensitive to new physics due to the heavier lepton mass enhancing Higgs contributions.

Core claim

The Type III 2HDM produces observable deviations from the Standard Model in the differential branching ratios and forward-backward asymmetries of Lambda_b to Lambda, Sigma_b to Sigma, and Xi_b to Xi dileptonic decays, testable at LHCb and Belle II.

Load-bearing premise

The transition form factors calculated via light-cone QCD sum rules are sufficiently accurate across the full kinematic range to distinguish SM from 2HDM predictions. The abstract states form factors are 'calculated via light cone QCD in full theory,' but light-cone sum rules carry systematic uncertainties from input distribution amplitudes and truncation that may be comparable to or larger than the 2HDM deviations being sought.

Editorial analysis

A structured set of objections, weighed in public.

Desk editor's note, referee report, simulated authors' rebuttal, and a circularity audit.

Axiom & Free-Parameter Ledger

4 free parameters · 3 axioms · 1 invented entities

The 2HDM Type III introduces several free parameters (Yukawa couplings, mixing angles, Higgs masses) that must be constrained from external data. The abstract does not specify their values or sources, making it impossible to assess whether they are independently constrained or fitted. The light-cone QCD sum rule parameters are standard auxiliary inputs. The second Higgs doublet is a model postulate inherited from the 2HDM framework, not invented by this paper, and its effects are in principle falsifiable.

free parameters (4)
  • 2HDM Type III Yukawa coupling parameters = not specified in abstract
    The Type III 2HDM has general Yukawa couplings parameterized by matrices with free entries. These must be constrained from data; the abstract does not specify values or sources.
  • Higgs mixing angles (alpha, beta or equivalent) = not specified in abstract
    The CP-even and CP-odd Higgs mixing angles are free parameters of the 2HDM. Not specified in abstract.
  • Higgs masses (m_H, m_A, m_H+/-) = not specified in abstract
    The masses of the additional Higgs bosons are free parameters. Not specified in abstract.
  • Light-cone QCD sum rule parameters (Borel window, thresholds, condensates) = not specified in abstract
    Form factor extraction via LCSR involves auxiliary parameters (Borel mass, continuum threshold, QCD condensate values) that are chosen within ranges. Not specified in abstract.
axioms (3)
  • standard math Standard Model effective Hamiltonian for b->s l+l- transitions
    The Wilson coefficients and operator basis for the rare decay amplitude are standard results from the SM and are used as input. Invoked implicitly in the abstract's reference to 'decay amplitude.'
  • domain assumption Light-cone QCD sum rules provide reliable baryon transition form factors
    The paper relies on LCSR for form factor calculation. This is a standard method in the field but carries systematic uncertainties from distribution amplitudes and truncation. The abstract states form factors are 'calculated via light cone QCD in full theory.'
  • domain assumption 2HDM Type III Yukawa structure is the correct parameterization for new physics
    The choice of 2HDM Type III with general Yukawa couplings is a model assumption. The abstract frames the analysis 'in the context of the general Two-Higgs-Doublet Model with Type III.'
invented entities (1)
  • Second Higgs doublet (additional scalar sector) independent evidence
    purpose: Provides new physics contributions to b->sll amplitudes via modified Wilson coefficients and scalar operators
    The 2HDM is a well-studied extension of the SM. The additional Higgs doublet is a model postulate, but its effects are falsifiable through the decay observables predicted in this paper and constrained by other processes. Not invented by this paper.

pith-pipeline@v1.1.0-glm · 4760 in / 2176 out tokens · 671041 ms · 2026-07-06T08:43:00.229136+00:00 · methodology

0 comments
read the original abstract

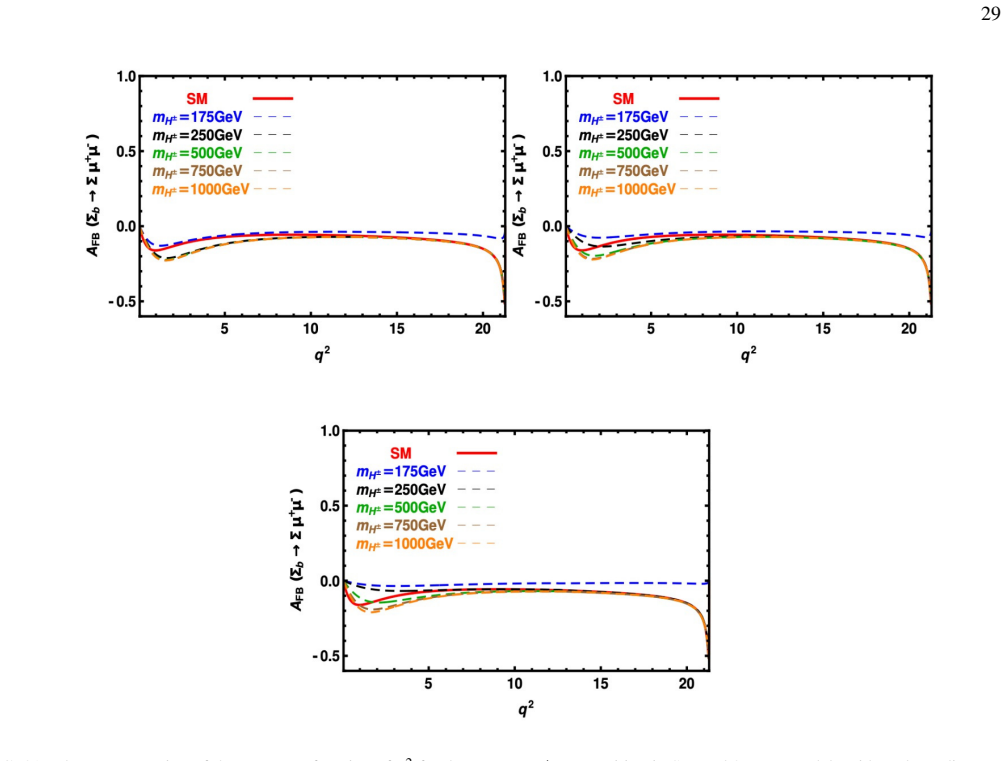
We investigate rare special dileptonic decays of $ \Lambda_b$, $\Sigma_b$ and $\Xi_b $ baryons in the Standard Model and context of the general Two-Higgs-Doublet Model with Type III. Specifically, we consider the decays $ \Lambda_b \rightarrow \Lambda \ell^+ \ell^-$, $\Sigma_b \rightarrow \Sigma \ell^+ \ell^-$ and $\Xi_b \rightarrow \Xi \ell^+ \ell^-$, where $\ell$ represents $\mu$ or $\tau$ lepton. By studying these rare decays, we aim to assess the impact of the Two-Higgs-Doublet Model with Type III on various observables, such as the differential decay width, the total decay width, the differential branching ratio, total branching ratio, and lepton forward-backward asymmetries using the decay amplitude and the transition matrix elements in terms of form factors calculated via light cone QCD in full theory. We compare our results to those of the Standard Model, as well as existing lattice QCD predictions and experimental data, to assess the agreement and viability of the Two-Higgs-Doublet Model with Type III. Furthermore, we highlight the potential for experimental investigations of these decay channels in the near future. The soon-to-be updated LHCb and/or Belle II detectors, renowned for their capabilities in studying rare decays, present excellent opportunities for probing the predicted branching ratios.

Figures

Figures reproduced from arXiv: 2604.15834 by A. T. Olgun, K. Azizi, Z. Tavuko\u{g}lu.

Figure 1
Figure 1. Figure 1: FIG. 1. The dependence of the [PITH_FULL_IMAGE:figures/full_fig_p012_1.png] view at source ↗
Figure 2
Figure 2. Figure 2: FIG. 2. The dependence of the [PITH_FULL_IMAGE:figures/full_fig_p013_2.png] view at source ↗
Figure 3
Figure 3. Figure 3: FIG. 3. The dependence of the [PITH_FULL_IMAGE:figures/full_fig_p014_3.png] view at source ↗
Figure 4
Figure 4. Figure 4: FIG. 4. The dependence of the [PITH_FULL_IMAGE:figures/full_fig_p015_4.png] view at source ↗
Figure 5
Figure 5. Figure 5: FIG. 5. The dependence of the [PITH_FULL_IMAGE:figures/full_fig_p015_5.png] view at source ↗
Figure 6
Figure 6. Figure 6: FIG. 6. The dependence of the [PITH_FULL_IMAGE:figures/full_fig_p016_6.png] view at source ↗
Figure 7
Figure 7. Figure 7: FIG. 7. The dependence of the [PITH_FULL_IMAGE:figures/full_fig_p017_7.png] view at source ↗
Figure 8
Figure 8. Figure 8: FIG. 8. The dependence of the [PITH_FULL_IMAGE:figures/full_fig_p018_8.png] view at source ↗
Figure 9
Figure 9. Figure 9: FIG. 9. The dependence of the [PITH_FULL_IMAGE:figures/full_fig_p019_9.png] view at source ↗
Figure 10
Figure 10. Figure 10: FIG. 10. The dependence of the [PITH_FULL_IMAGE:figures/full_fig_p019_10.png] view at source ↗
Figure 11
Figure 11. Figure 11: FIG. 11. The dependence of the [PITH_FULL_IMAGE:figures/full_fig_p020_11.png] view at source ↗
Figure 12
Figure 12. Figure 12: FIG. 12. The dependence of the [PITH_FULL_IMAGE:figures/full_fig_p021_12.png] view at source ↗
Figure 13
Figure 13. Figure 13: FIG. 13. The dependence of the [PITH_FULL_IMAGE:figures/full_fig_p022_13.png] view at source ↗
Figure 14
Figure 14. Figure 14: FIG. 14. The dependence of the [PITH_FULL_IMAGE:figures/full_fig_p023_14.png] view at source ↗
Figure 15
Figure 15. Figure 15: FIG. 15. The dependence of the [PITH_FULL_IMAGE:figures/full_fig_p023_15.png] view at source ↗
Figure 16
Figure 16. Figure 16: FIG. 16. The representation of the [PITH_FULL_IMAGE:figures/full_fig_p024_16.png] view at source ↗
Figure 17
Figure 17. Figure 17: FIG. 17. The representation of the [PITH_FULL_IMAGE:figures/full_fig_p025_17.png] view at source ↗
Figure 18
Figure 18. Figure 18: FIG. 18. The representation of the [PITH_FULL_IMAGE:figures/full_fig_p026_18.png] view at source ↗
Figure 19
Figure 19. Figure 19: FIG. 19. The representation of the [PITH_FULL_IMAGE:figures/full_fig_p027_19.png] view at source ↗
Figure 20
Figure 20. Figure 20: FIG. 20. The representation of the [PITH_FULL_IMAGE:figures/full_fig_p028_20.png] view at source ↗
Figure 21
Figure 21. Figure 21: FIG. 21. The representation of the [PITH_FULL_IMAGE:figures/full_fig_p029_21.png] view at source ↗
Figure 22
Figure 22. Figure 22: FIG. 22. The representation of the [PITH_FULL_IMAGE:figures/full_fig_p030_22.png] view at source ↗
Figure 23
Figure 23. Figure 23: FIG. 23. The representation of the [PITH_FULL_IMAGE:figures/full_fig_p031_23.png] view at source ↗
Figure 24
Figure 24. Figure 24: FIG. 24. The representation of the [PITH_FULL_IMAGE:figures/full_fig_p032_24.png] view at source ↗
Figure 25
Figure 25. Figure 25: FIG. 25. The representation of the [PITH_FULL_IMAGE:figures/full_fig_p033_25.png] view at source ↗
Figure 26
Figure 26. Figure 26: FIG. 26. The representation of the [PITH_FULL_IMAGE:figures/full_fig_p034_26.png] view at source ↗
Figure 27
Figure 27. Figure 27: FIG. 27. The representation of the [PITH_FULL_IMAGE:figures/full_fig_p035_27.png] view at source ↗

discussion (0)

Sign in with ORCID, Apple, or X to comment. Anyone can read and Pith papers without signing in.